

TMKMS setup for XRPL validator Guide
Table of Contents
Introduction
Importance of secure key management for validators
How it works and practical examples
Overview of Tendermint Key Management System
System Requirements for TMKMS Setup
Minimum software requirements for setting up TMKMS
TMKMS Setup
Step-by-step guide to setting up TMKMS on a server
Basic steps to improve security settings when using TMKMS
Alternative Options
Introduction
Importance of secure key management for validators.
Managing private keys is critical for the operation of a validator. These keys are responsible for signing and validating blocks in the network. Therefore, they require a proper level of protection and management.
If attackers gain access to the private keys, it could lead to serious threats, such as network consensus violations, double signing, and more.
Secure storage and handling of keys are not only important to protect against hacking but also to prevent missing signed blocks, double signing, which could result in penalties and other consequences.
A private key stored directly on the validator node is much more vulnerable than one stored separately. For instance, during technical failures of the server, migration of the validator to another server, or careless synchronization without the current priv_validator_state.json file (which contains information about previously signed blocks), the validator may inadvertently perform a double sign of the same block.
In the case of using TMKMS, your private key is separated from the node, significantly reducing the risks. You perform minimal operations with the key, and it remains secure at all times, even during node restoration or synchronization. Additionally, the current signed blocks are stored, ensuring the correct and secure signing of transactions. In the event of a failure, it will be enough to redirect the TCP connection to a backup node, allowing for a quick recovery without compromising security.
How it works and practical examples:
By using TMKMS, when the validator stops working, your private keys remain secure on the TMKMS server. In this case, it is enough to simply redirect the TCP connection from TMKMS to the Backup Validator Node, and the block signing will automatically resume - without losing participation in the consensus and without the risk of being slashed.
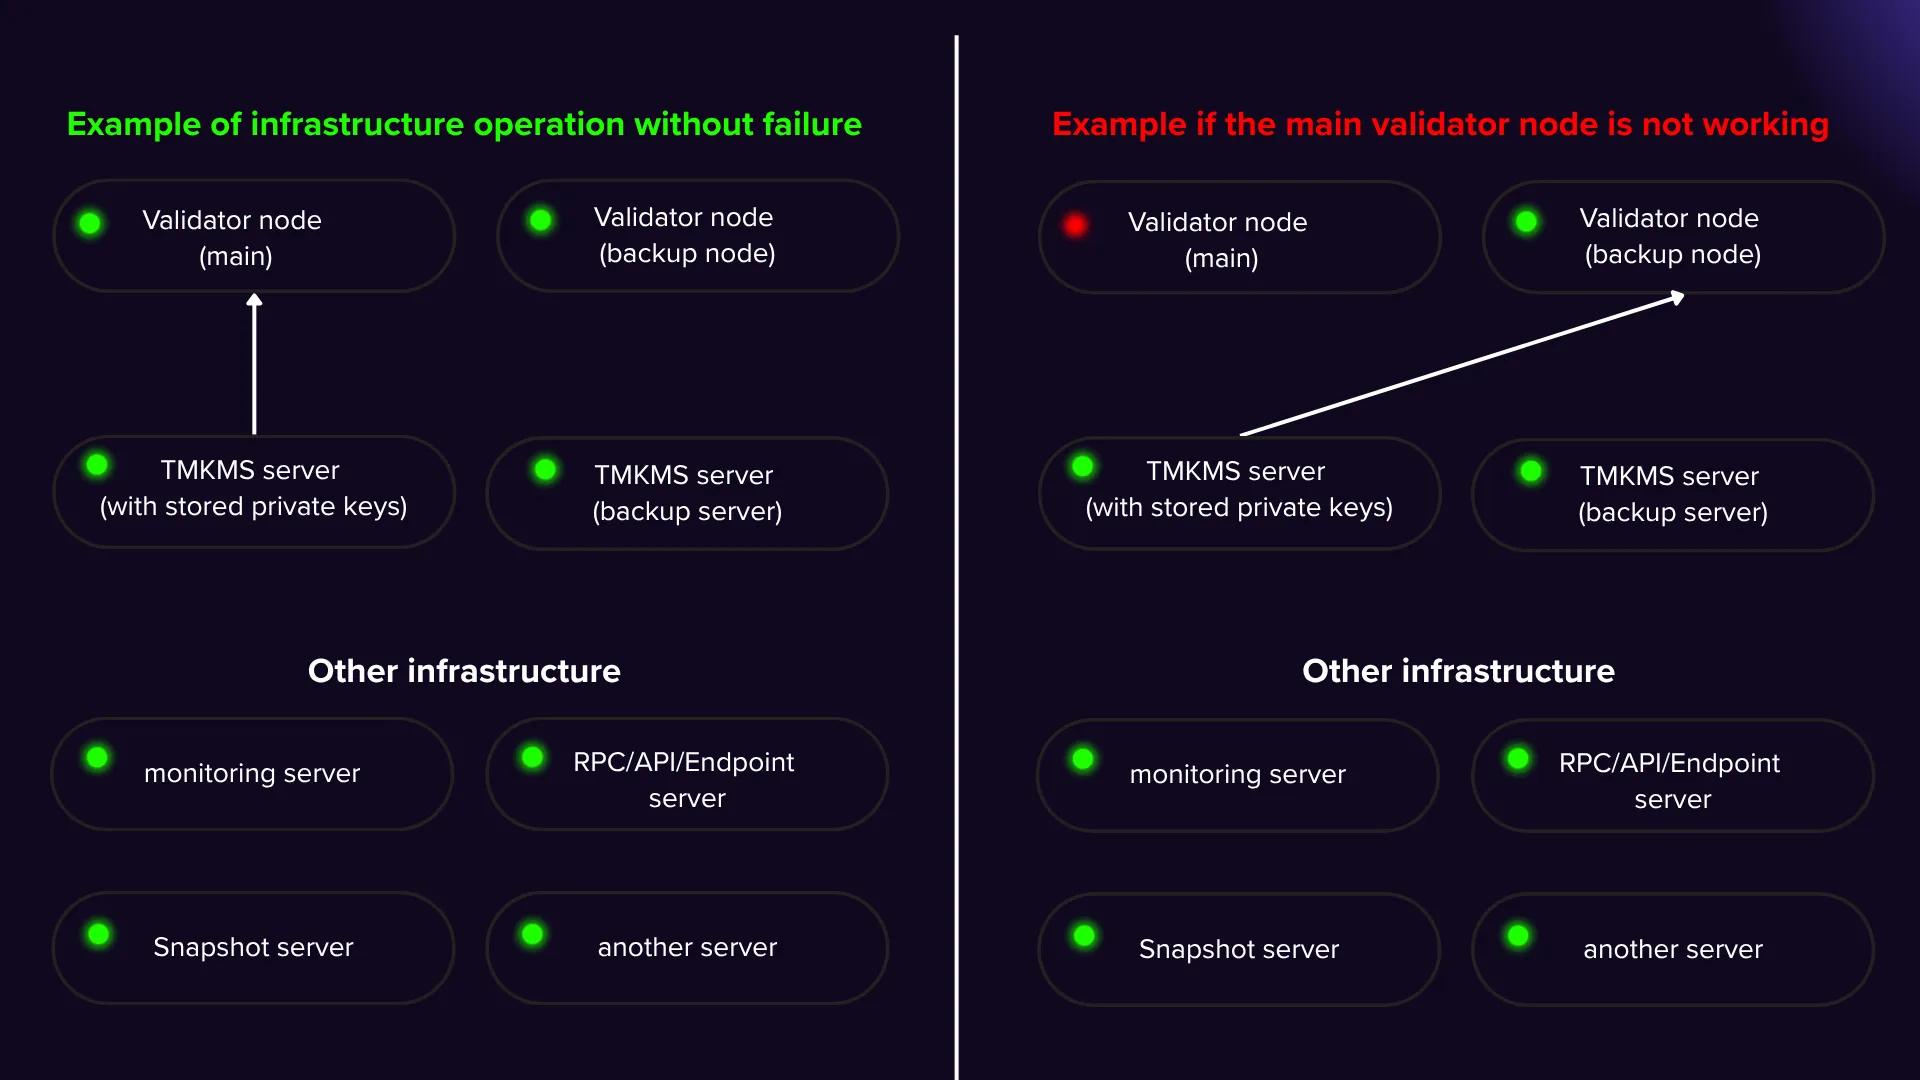
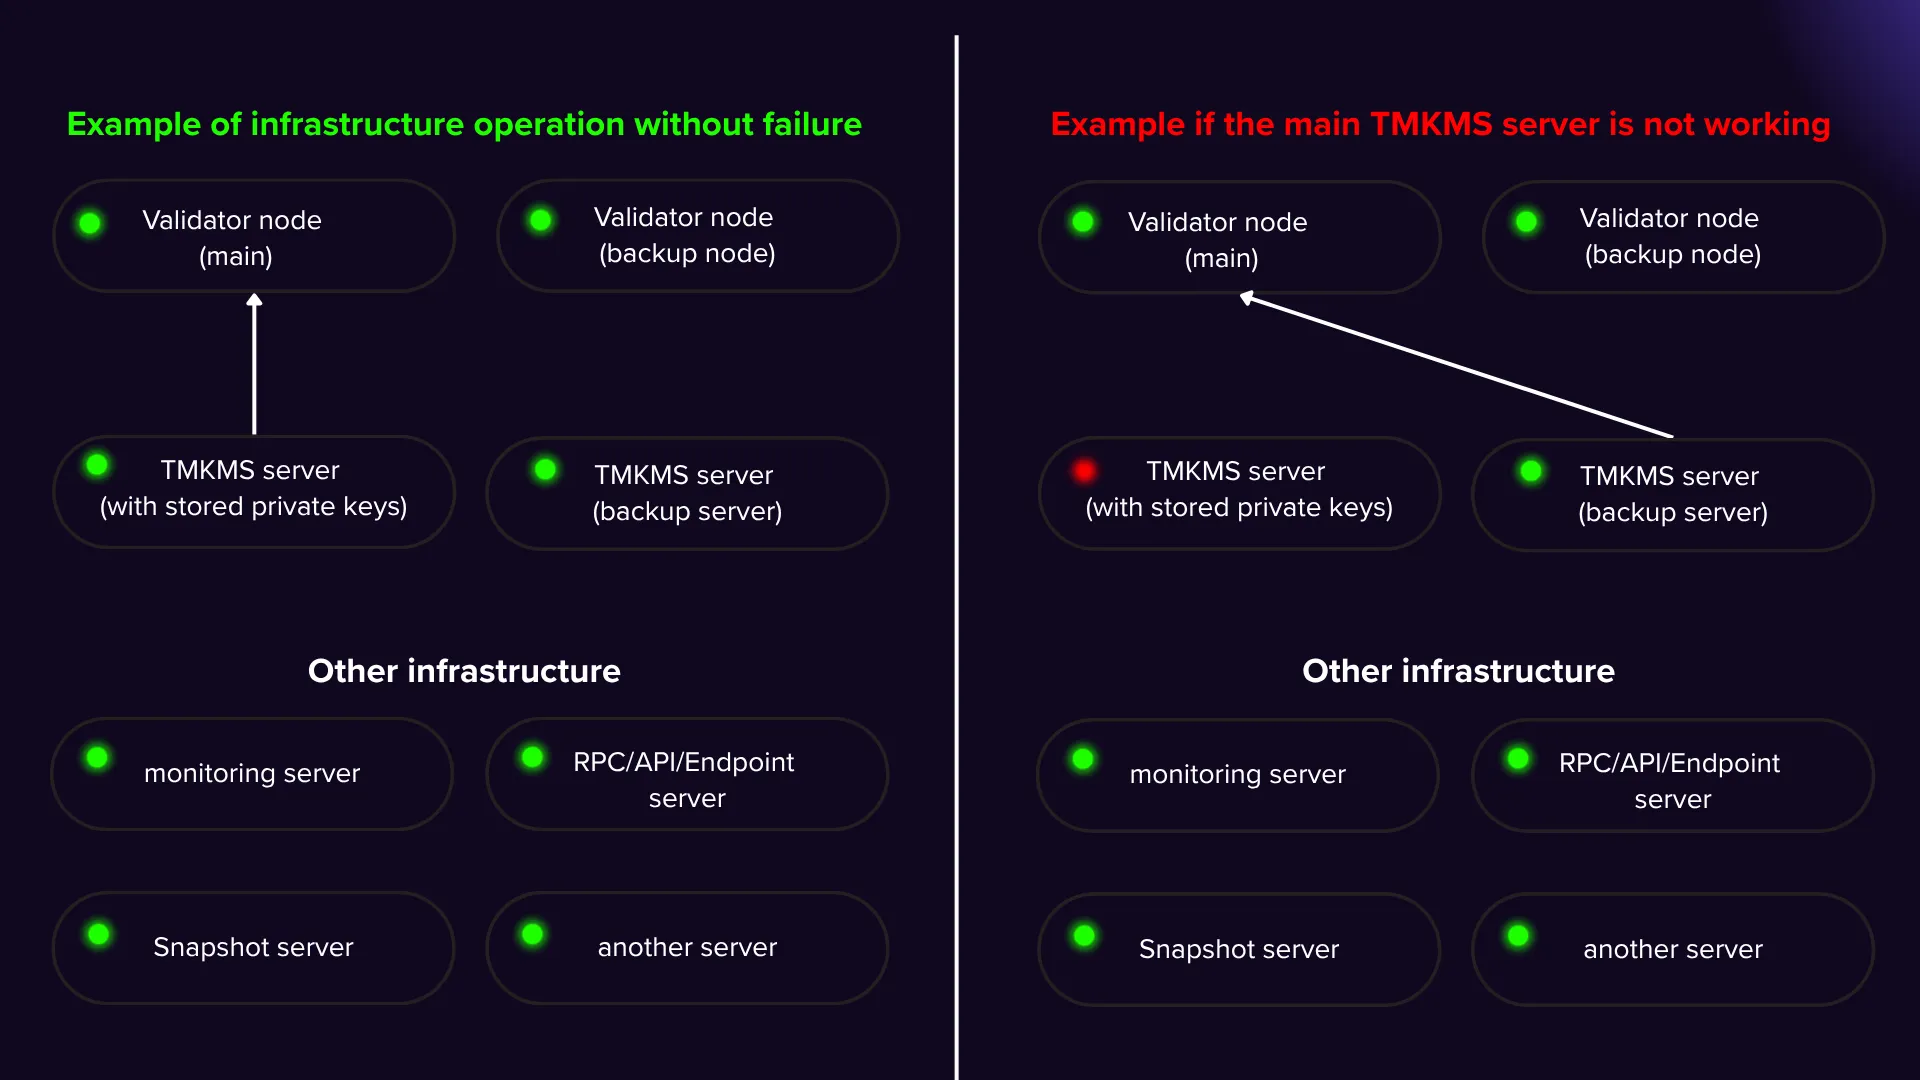
In the event that the TMKMS server stops working, the situation becomes more complicated because you lose access to the current file for signing blocks with your validator. In this case, you need to redirect the requests to a fully synchronized node that has the current state with the network to restore block signing and ensure the continuous operation of the validator.
For stable architecture operation, it is crucial to adhere to basic security principles: firewall, fail2ban, SSH keys, VPN or sentry-node, monitoring, port access restrictions, and creating users with defined permissions.
Equally important is having supporting infrastructure - RPC, seed nodes, snapshot servers - so that the validator can quickly resume operation after failures. It is also recommended to use reliable server providers and distribute infrastructure across different data centers and countries, which increases resilience to regional failures and contributes to the decentralization of the network.
Automation, for example, through Ansible, reduces the risk of errors and simplifies the management of the entire system.
Overview of Tendermint Key Management System
Tendermint Key Management System (TMKMS) is a solution for securely managing the private keys required for signing blocks in networks running on Tendermint. TMKMS separates key management from the validation process, which significantly enhances the security of validators and reduces the risk of key compromise.
Initially developed by the Cosmos team, it is currently maintained by Iqlusioninc.
Key features:
Separation of validator keys onto a separate server or HSM (Hardware Security Module)
Remote key storage using HSMs (hardware security modules)
Remote signing of transactions through TCP connections
Simple switching of validator operation to another server in case of failures
Storage and Signing Support:
Soft-sign: This is a software-based signing method where transactions are signed using a standard private key. Compared to the absence of TMKMS, this approach offers the advantage of double protection and storing keys on separate servers, providing additional security.
Hardware Security Modules (HSM): Devices such as Ledger Nano S and YubiHSM use hardware-based signing, allowing transactions to be signed without exposing private keys. While this method is more secure, it requires physical access to the server for the use of HSM devices.
In this example, it is configured to use soft-sign on a dedicated server, though there are even more secure options available with hardware security modules (HSM).
Minimum Software Requirements for TMKMS Setup
Operating Systems:
Linux (recommended) with x86_64 processor architecture
As an example, we use the following available servers with the following specifications:
TMKMS - 2 CPU / 8GB RAM / 100GB Storage
Validator Node - 8 Cores, 32GB RAM, 1TB of storage (NVME)
Software Dependencies:
Rust (version 1.72 or newer): https://rustup.rs/
C compiler: such as gcc or clang
pkg-config
libusb (version 1.0 or newer) github.com
NOTE (x86_64 only): Configure the
RUSTFLAGSenvironment variable:export RUSTFLAGS=-Ctarget-feature=+aes,+ssse3
Supported Signing Algorithms:
Ed25519: TMKMS supports signing transactions only using Ed25519, which is also used in XRPL.
secp256k1: The secp256k1 algorithm is not supported in TMKMS.
TMKMS Setup
Basic Steps to Improve Security Settings When Using TMKMS
Firewall Configuration
The TMKMS server should have a firewall that blocks all ports except for the SSH port. It is recommended to use a non-standard port for SSH, but in this example, we use port 22.
sudo ufw allow 22 sshsudo ufw enableTo allow access to the TMKMS ports, the UFW firewall should be configured to allow connections from specific IP addresses to the required port (e.g., port 26658). Here’s how you can do it:
sudo ufw allow from <IP TMKMS> proto tcp to any port 26658 # For the primary TMKMS serversudo ufw allow from <IP Backup TMKMS> proto tcp to any port 26658 # For the backup TMKMS serverYou can additionally configure:
Firewall, fail2ban, SSH keys, VPN or sentry-node, monitoring, port access restrictions, and creating users with defined permissions.
Suggested Steps:
Create a user with restricted access permissions
Fail2ban
SSH access via SSH keys
Server monitoring, for example, collecting metrics via node_exporter
Stunnel / VPN / Sentry node
Regularly update the system
Logging (e.g., using Loki)
Step-by-Step Guide for TMKMS Setup on the Server
Install Rust
sudo apt install rustc curl build-essential gcc makecurl --proto '=https' --tlsv1.2 -sSf https://sh.rustup.rs | shsource $HOME/.cargo/envInstall TMKMS
git clone https://github.com/iqlusioninc/tmkms.gitcd tmkmscargo build --release --features=softsigncargo install tmkms --features=softsigntmkms versionMove the private key to the TMKMS server.
Move your priv_validator_key.json to the TMKMS server for validator import, for example, we moved it to $HOME.
Create a directory for the network and initialize TMKMS for it:
mkdir -p $HOME/tmkms/xrpl-tesnettmkms init $HOME/tmkms/xrpl-testnetIt will return:
Generated KMS configuration: /home/user/tmkms/xrpl-testnet/tmkms.tomlGenerated Secret Connection key: /home/user/tmkms/xrpl-testnet/secrets/kms-identity.keyImport the private key into the folder
tmkms softsign import $HOME/priv_validator_key.json $HOME/tmkms/xrpl-testnet/secrets/xrpl-testnet-validator.key
It will return:
INFO tmkms::commands::softsign::import: Ipmorted Ed25519 private key to /home/user/tmkms/xrpl-testnet/secrets/xrpl-testnet-validator.key
Save and delete the original priv_validator_key.json file.
Make sure you have a backup of your key before entering the next command.
Removing the private key
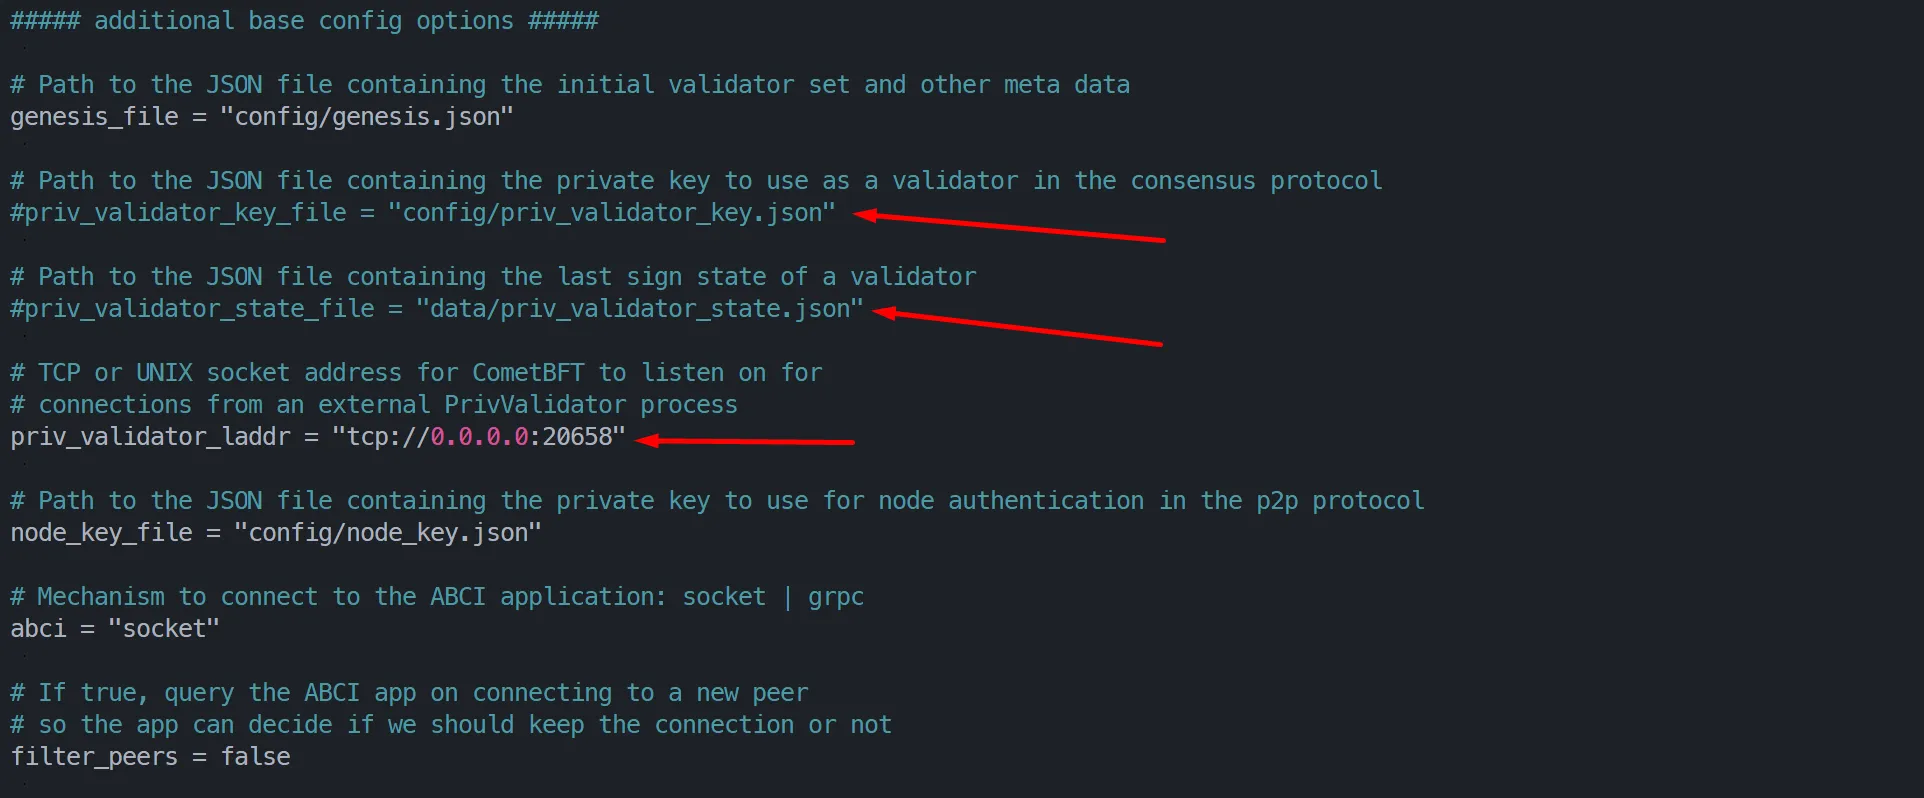
sudo shred -uvz $HOME/priv_validator_key.jsonEdit the configuration file $HOME/tmkms/xrpl-testnet/tmkms.toml
Depending on your settings, modify the following:
chain id: Ensure the chain ID is up to date.Path to state_file: Specifies the state file of your validator, typically located in the directory related to your specific test or network.Path to path: Specifies the signing key used by TMKMS.Path to secret_key: Specifies the secret key used for network connection and authentication.Port 26658: Replace with another port if it has been changed.
sudo tee $HOME/tmkms/xrpl-testnet/tmkms.toml > /dev/null <<EOF# Chain Configuration[[chain]]id = "xrplevm_1449000-1"key_format = { type = "bech32", account_key_prefix = "ethm", consensus_key_prefix = "ethmvalconspub" }state_file = "/home/user/tmkms/xrpl-testnet/state/xrpl-testnet-state.json"# Software-based Signer[[providers.softsign]]chain_ids = ["xrplevm_1449000-1"]key_type = "consensus"path = "/home/user/tmkms/xrpl-testnet/secrets/xrpl-testnet-validator.key"# Validator Configuration[[validator]]chain_id = "xrplevm_1449000-1"addr = "tcp://<VALIDATOR_IP>:26658"secret_key = "/home/user/tmkms/xrpl-testnet/secrets/kms-identity.key"protocol_version = "v0.34"reconnect = trueEOFSystemD configuration
Prepare the necessary commands to use TMKMS as a serviceCreate the service file xrpl-testnet.servicesudo tee /etc/systemd/system/xrpl-testnet.service << EOF[Unit]Description=xrpl-testnetAfter=network.targetStartLimitIntervalSec=0[Service]Type=simpleRestart=alwaysRestartSec=10User=$USERExecStart=$(which tmkms) start -c $HOME/tmkms/xrpl-testnet/tmkms.tomlLimitNOFILE=1024[Install]WantedBy=multi-user.targetEOF
Restart systemd, activate the xrpl-testnet.service, start the service and check its status:
Make sure that before the next step, you have specified the correct IP address of the validator server in the configuration file, not the backup nodes, etc., where it is currently running and signing blocks.
Restart Systemd service
sudo systemctl daemon-reloadsudo systemctl enable xrpl-testnet.servicesudo systemctl start xrpl-testnet.servicesudo systemctl status xrpl-testnet.serviceYou will see the following logs
2025-06-19T22:00:37.270809Z ERROR tmkms::client: [xrpl-testnet-2@tcp://<YOUR_IP>:20658] I/O error: Connection refused (os error 111)2025-06-19T22:00:38.270988Z INFO tmkms::connection::tcp: KMS node ID: 041e7bf02849297e2212d2810880e10cbce37bce2025-06-19T22:00:38.271406Z ERROR tmkms::client: [xrpl-testnet-2@tcp://<YOUR_IP>:20658] I/O error: Connection refused (os error 111)2025-06-19T22:00:39.271594Z INFO tmkms::connection::tcp: KMS node ID: 041e7bf02849297e2212d2810880e10cbce37bce2025-06-19T22:00:39.271989Z ERROR tmkms::client: [xrpl-testnet-2@tcp://<YOUR_IP>:20658] I/O error: Connection refused (os error 111)2025-06-19T22:00:40.272186Z INFO tmkms::connection::tcp: KMS node ID: 041e7bf02849297e2422d2810880e10cbce37bceThese logs mean that TMKMS is attempting to connect to your validator at the address IP:PORT:20658. However, your node is currently not configured to accept connections on this port.
If priv_validator_laddr in $HOME/.exprd/config/config.tomlis correctly configured and the port is open, once you configure the node, TMKMS will be able to connect without any additional settings from your side.
Configuring the Validator Node
Currently, we will perform the following setup:
Edit the validator node's configuration file config.toml
nano $HOME/.exprd/config/config.tomlFind the following section of the code:
Comment out priv_validator_state.file and priv_validator_key.file.
In priv_validator_laddr, enter the following value:
sudo systemctl restart exprdRestart the validator node to apply the changes.
sudo systemctl restart exprd
Check the log journal of the TMKMS service.
sudo journalctl -u exprd -f -o catYou will see logs similar to the following:2025-06-19T22:03:08.827961Z INFO tmkms::keyring: [keyring:softsign] added consensus Ed25519 key: your_valcons2025-06-19T22:03:08.828110Z INFO tmkms::connection::tcp: KMS node ID: 041e7bf02849297e2412d28108a0e10cbce37bce2025-06-19T22:03:08.829344Z INFO tmkms::session: [xrpl-testnet-2@tcp://<YOUR_IP>:26658] connected to validator successfully2025-06-19T22:03:08.829353Z WARN tmkms::session: [xrpl-testnet-2@tcp://<YOUR_IP>:26658]: unverified validator peer ID! (40d737fc9519a8e37653cd47c8db08d96830c12a)2025-06-19T22:03:08.830348Z INFO tmkms::session: [xrpl-testnet-2@tcp://<YOUR_IP>:26658] signed Prevote:7D1E173545 at h/r/s 3384376/0/1 (0 ms)2025-06-19T22:03:08.853571Z INFO tmkms::session: [xrpl-testnet-2@tcp://<YOUR_IP>:26658] signed Precommit:7D1E173545 at h/r/s 3384376/0/2 (0 ms)
Congratulations, your validator is remotely signing transactions from a separate server.
Alternative Options
You can also use Horcrux - a multi-party computation (MPC) signing service.